
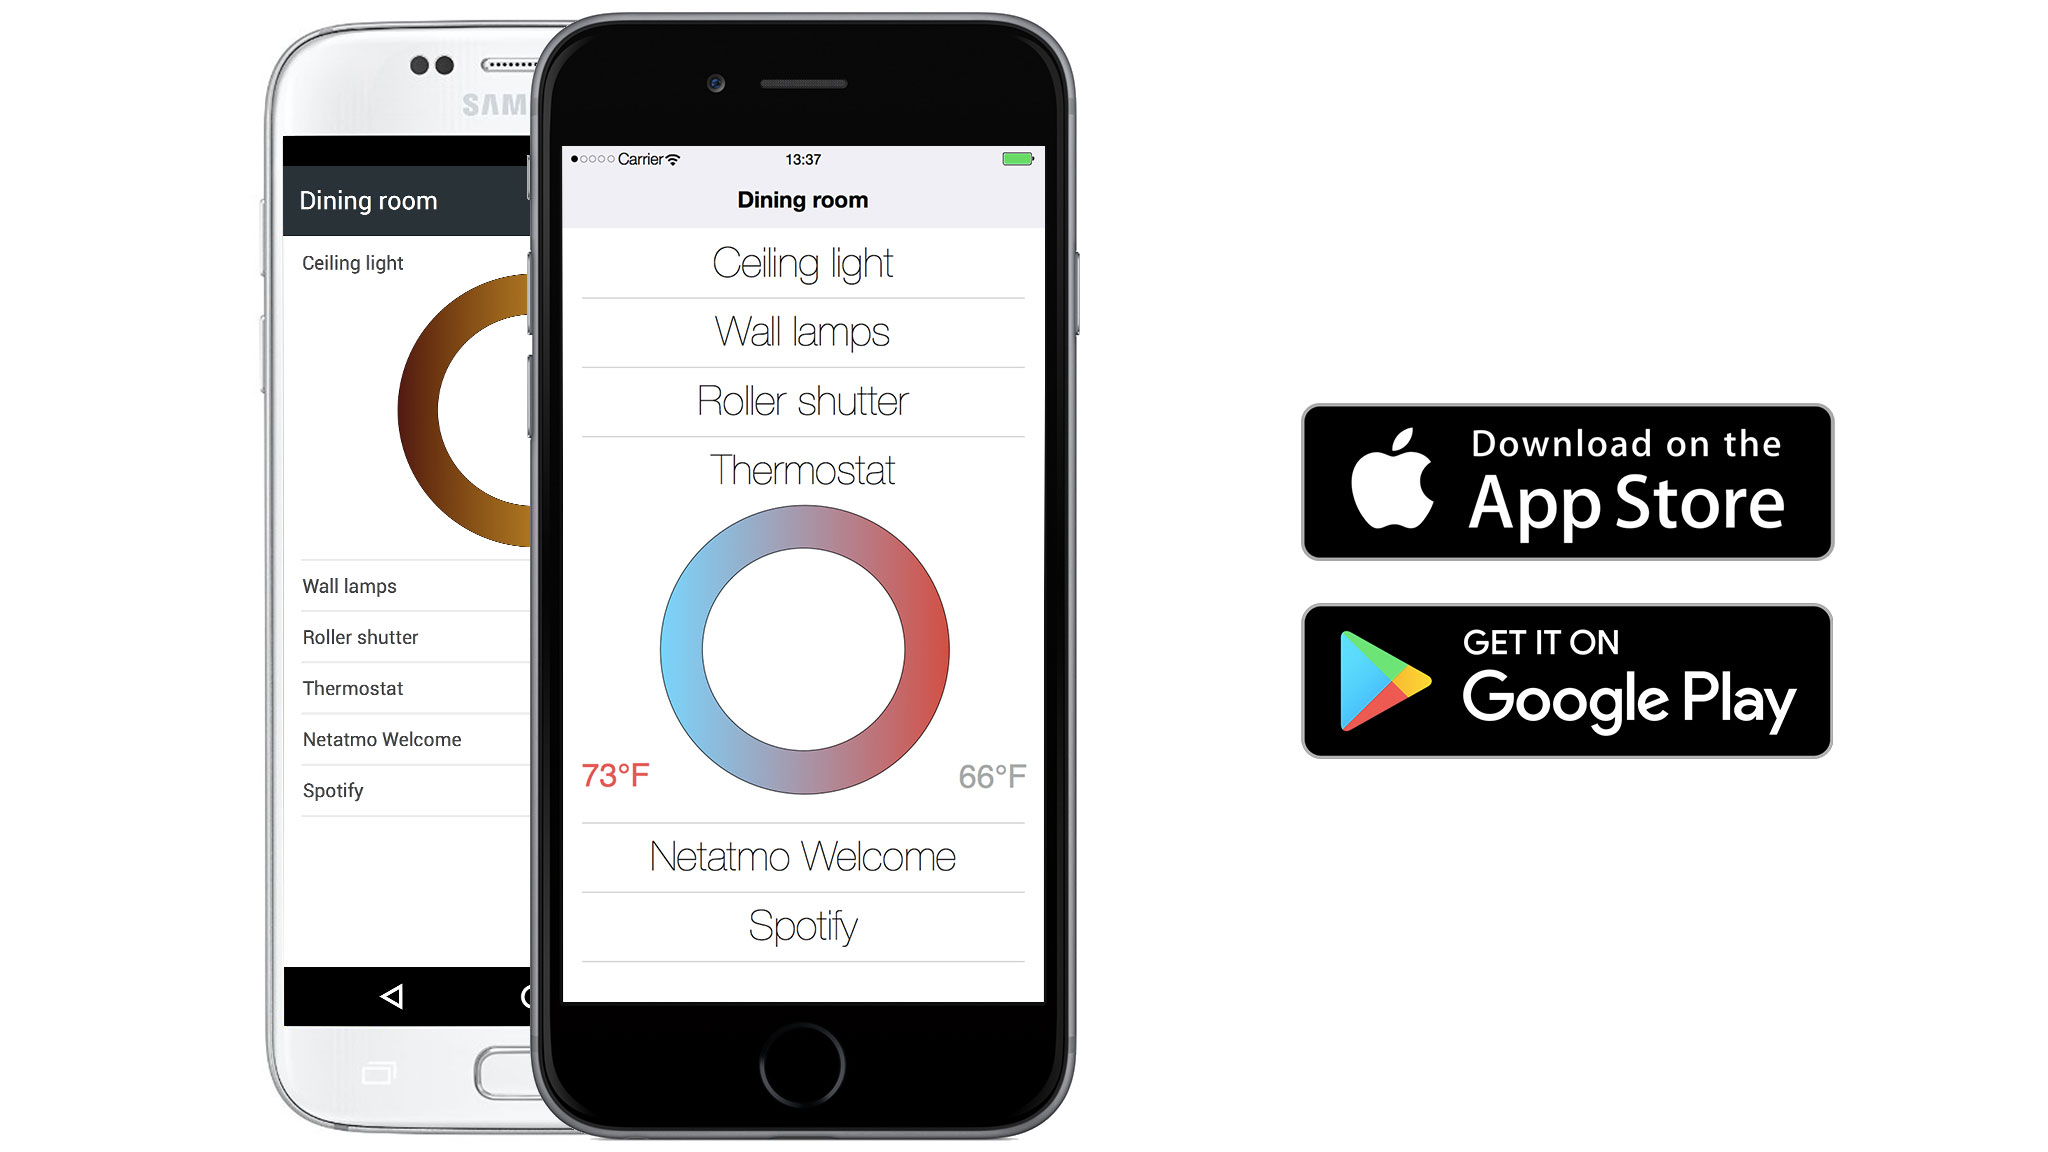
Hi and welcome on infini Developper page !
infini is An App-based Smart Home Hub Which Organizes Your Home & Your Life.
Dev applications work with node.js. Our technical specifications have not been completely fixed. Our aim is to have your feedback about the software architecture
Fundamentals of software architecure
Our app architecture takes into account house architecture and especially multiroom. An app could be seen as a "master" with "children". Each child can be installed in a different room.
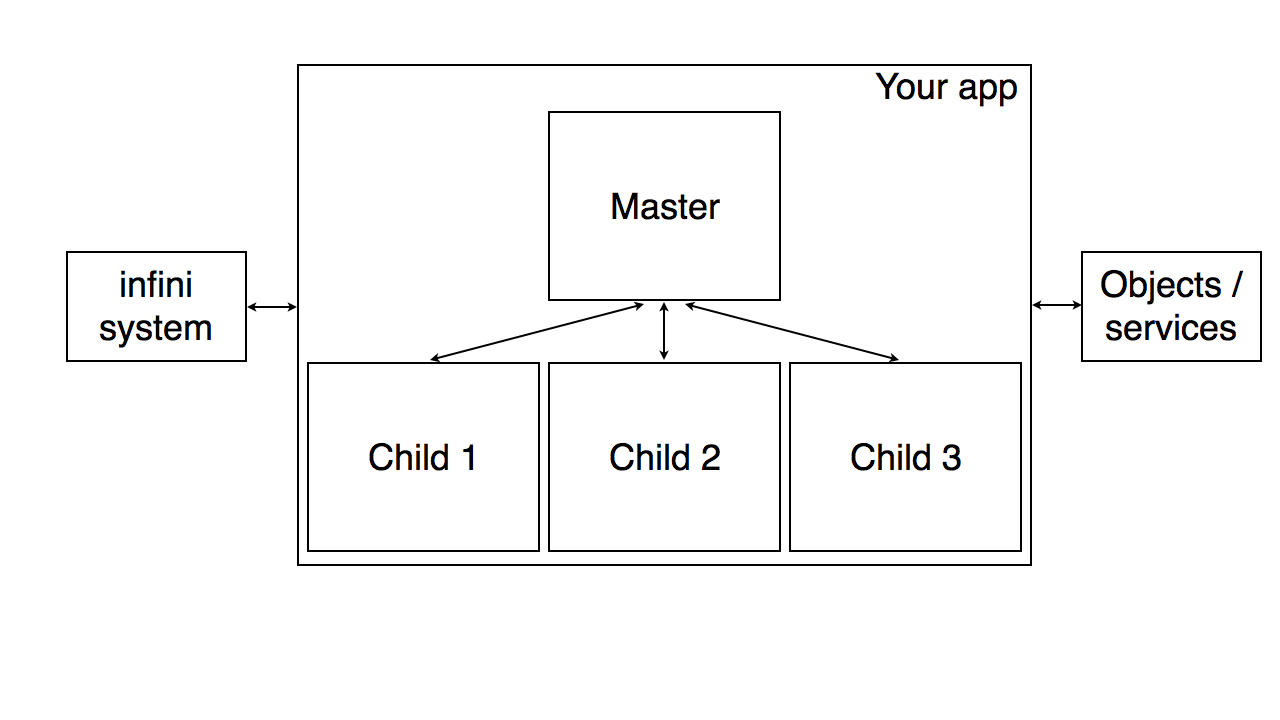
An application can manage different physical objects or services. Actually, for the user, the "real" applications are same as "children"! For example, your application can manage light bulbs and outlet ? So, in this example, the first child is "Light" and the other one is "Smart Plug".
How to create an application ?
Creating an application is too simple. Here we can have the necessary elements:
Package.json file
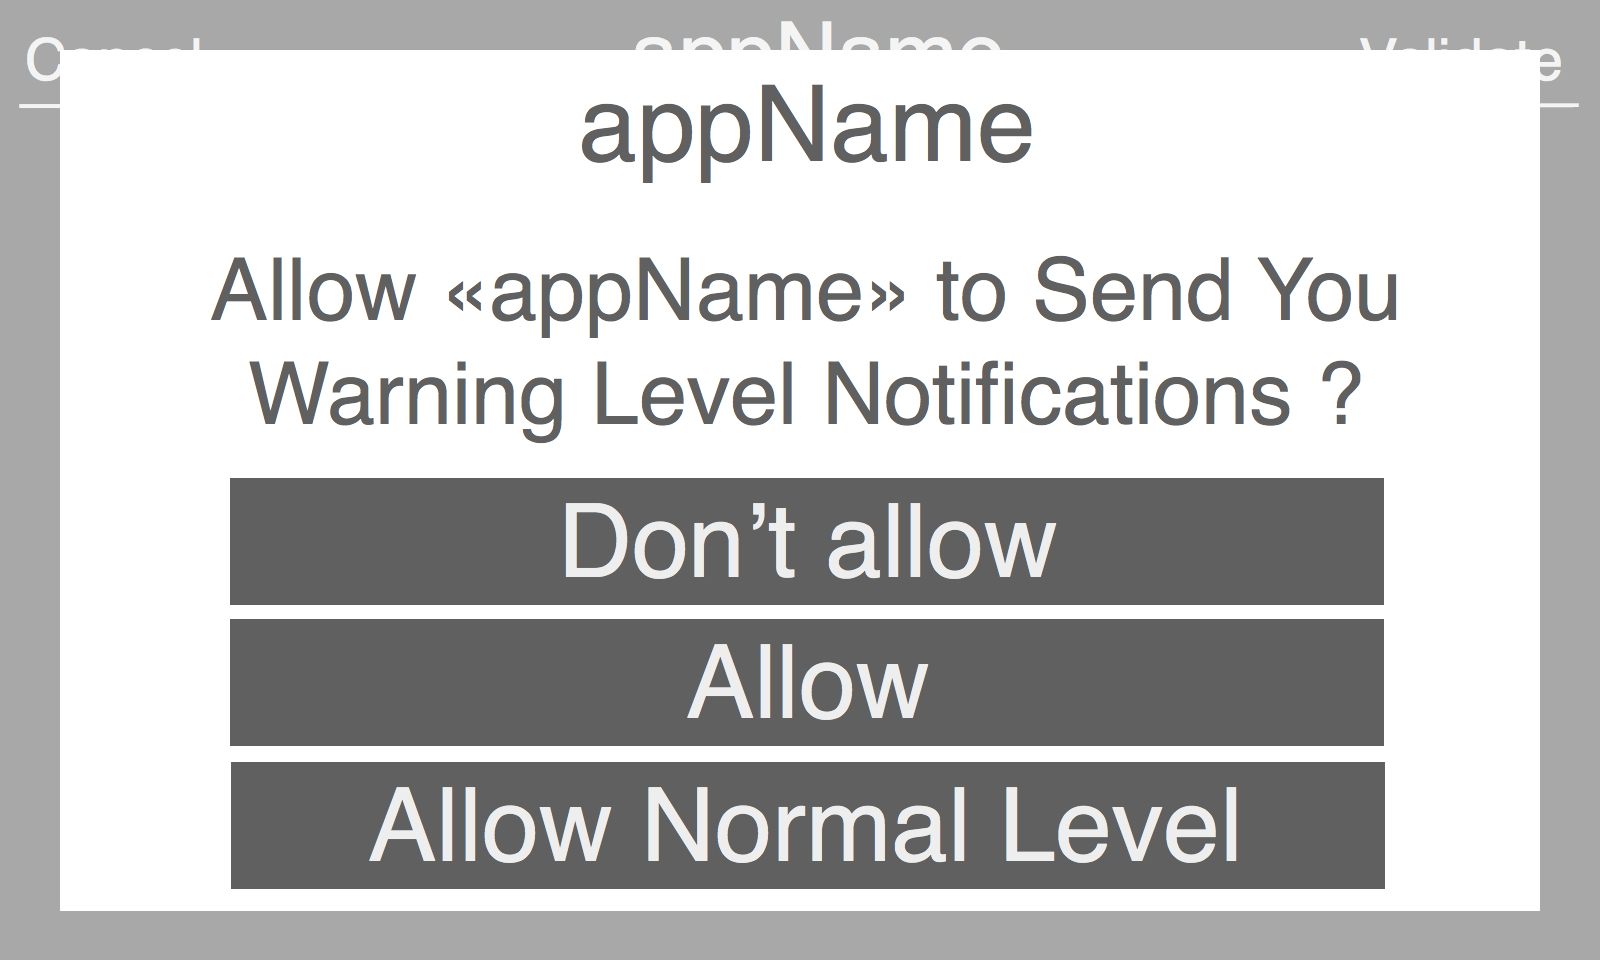
The first step is to make a "package.json" file. It should include, at least: application name, developer name, version number, package identifer, installation file name, main file name and requested rights (Notification , Scenarios ...)
{
"name": "appName",
"version": "1.0.0",
"author":"infini",
"packageId":"com.getinfini.example",
"install":"install.js",
"main":"example.js",
"notification":"warning"
}
Installation file
This file will runs automaticaly after downloading or by the user if he wants to manage your application.
Your installation file will be correct, if you define certain number of elements.
To allow communication between your installer and our system, you must define an eventEmitter.
var eventEmitter=require('events').EventEmitter;
var event=new eventEmitter();
Graphical User Interface of your install will be done in HTML / CSS. So, you have to define a server with Express for example.
var express = require('express');
var router = express.Router();
var eventEmitter=require('events').EventEmitter;
var event=new eventEmitter();

router.get('/*', function (req, res, next) {
       res.write("Hello world");
       res.end();
});
module.exports = [router,event];
When your installer launches, the system will read your package.json and will ask the user whether accept the requested rights or not.
To recover this information and also the children that would have previously been installed, you should use "getConfiguration" and "configuration" to have the answer
event.emit("getConfiguration");
event.on("configuration",function(data){
       console.log(JSON.stringify(data));
});
The system will return a JSON file similar to this:
{
"name": "appName",
"version": "1.0.0",
"author":"infini",
"packageId":"com.getinfini.example",
"children":[],
"notification":"warning"
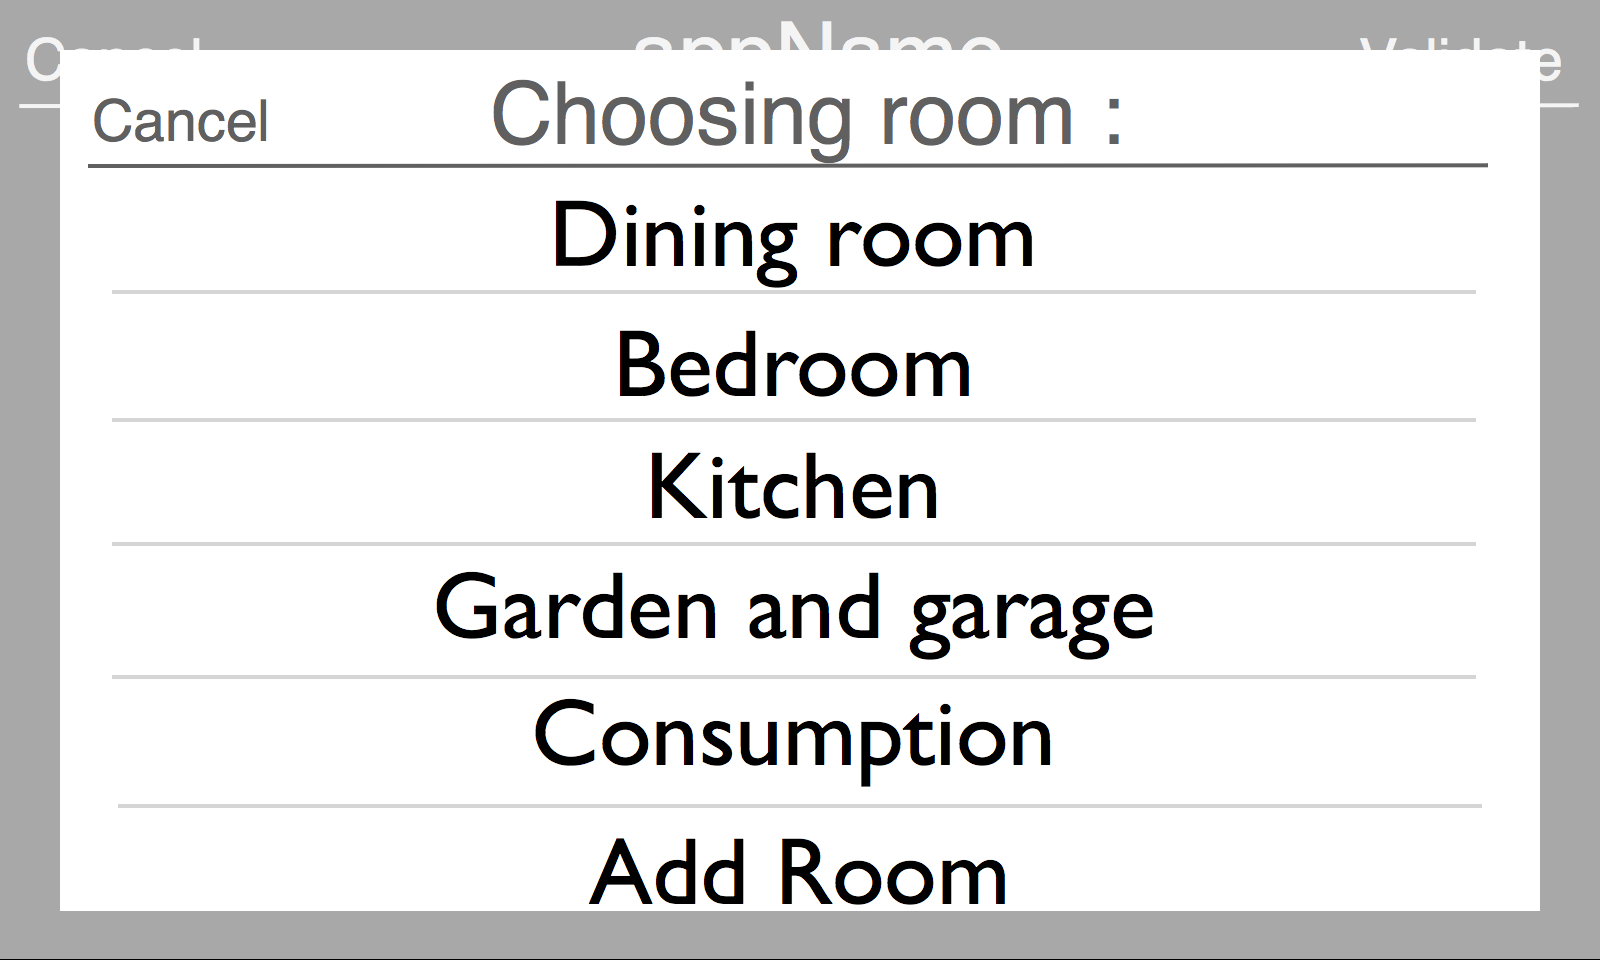
}The next step is to create a child. The user must be associated with the child's creation. The best way is to allow the user, via your GUI, select the elements of the child.
To create a new child, use the emitter "newChild". You must define the number of elements. First, you should give a unique identifier to your child. You should also specify a url allowing the system to call your child. You have to specify the type of child too, ie what your child doing (example: manage light, manage temperature, do an on / off ...). Differents types of elements are available and they will be published later.
Example of "basic" child :
var data={
"id":"yourID",
"type":"theType",
"url":"/myURL"
}
event.emit("newChild",data);
Your child may be able to handle several things. Several cases:
- Your child can handle several different things
For example, a ceiling fan can do 2 things: ventilation and light. In this case, you must create an array of "type" with a different identifier for each element.
var data={
       "id": "ceilingFan1",
       "url": "/ceilingFan1",
       "type": [{
              "id": "fan",
              "type": "fan"
       }, {
              "id": "light",
              "type": "light"
       }]
}
event.emit("newChild",data);
- Your child can handle multiple items of the same type
For example, it can independently manage multiple connected bulbs. The procedure is same as before, the only difference is the possibilty to assign a name for each element to better differentiate them for scenarios. You can ask the user to choose a name which they want.
var data={
       "id": "connectedLight",
       "url": "/light",
       "type": [{
              "id": "light1",
              "type": "light",
              "name":"Light left"
       }, {
              "id": "light2",
              "type": "light",
              "name":"Light right"
       }]
}
event.emit("newChild",data);
The user should validate the creation of your child, assign a name and select a room.
When the child has been created, you will receive a message by using the listener "child".
Remove a child
If you want remove a child, please use "removeChild". You will have to give the identifier of your child.
event.emit("removeChild","yourID");Once your installation has ended, you can emit an "endInstallation" to finish the installation.
Main file
This is your node.js app. As for the installer, it uses the same logic to your installation file. But, it's not possible to modify or create children.
Post Notifications
To send the notification, please use the emitter "newNotification". A notification must have several things:
- A title
- A subtitle
- A UUID
It may also optionally have:
- A color
- A type of emergency by default, the notification is considered "normal", but you can send "warning", "alert" and "alertMax" notifications according to what the user has authorized you.
- A format, by default, the notification is considered "normal" but you can also ask a question (with the ability to customize the text)
var data={"title":"Your Title", "subTitle":"Your Sub-Title", "uuid":"UUIDOfThisNotification"}
event.emit("newNotification",data);
Once the user has seen your notification, you will receive a message by listening to "notification". In the case of a "question" notification, you will also receive the user's response. The UUID is used to identify the notification.
Manage scenarios
If the user has authorized you, you can create scenarios. To do this, use the emitter "newScenario". A scenario must have a name (which you can define yourself or ask the user via your GUI) and a unique identifier.
There are two types of scenarios: weather they are directly operable by the user (example "alarm clock") or happens same as an event within your application (example: motion detection). The 2nd case is used By default. Add "userActivable" for the first case.
In this case and in order to be compatible with our application launcher, you must define an icon and / or text.
/*1st case :*/
var data={"title":"Alarm Clock", "uuid":"UUIDOfMyScenario1","userActivable":true,"userText":"06:00"};
event.emit("newScenario",data);
/*2nd case :*/
var data={"title":"Alarm Clock", "uuid":"UUIDOfMyScenario2"}
event.emit("newScenario",data);
In the first case, a scenario can be activated without being active. For example, the "wake-up" scenario can be activated by the user but it will only be active for the wake-up time.
To enable or disable a scenario, just emit :
event.emit("enableScenario",{"uuid":"UUIDOfMyScenario1", "enabled":true})And to trigger a scenario make :
event.emit("triggerScenario",{"uuid":"UUIDOfMyScenario1"})
Manage data and orders
To ensure that the system works properly, you must notify the system if an action has taken place within your application (eg lighting the lights, opening the roller shutters, starting the music, etc.).
You must give the following things:
- the child's UUID
- the type
- the value
If you have declared several types, you must also give the Id of type
var data={"uuid":"UUIDOfChild","type":"light", "value":false }
event.emit("newEvent",data);
The objective of our platform is to offer a compatibility between the equipment and in particular the possibility of creating scenarios.
Your application must be able to receive orders in order to be compatible with the system.
You have to set up an "order listener". The system can send you an order by giving you the following elements:
- the child's UUID
- the type
- the value
If you have declared several types, it will also give you the Id of type.
HTML / CSS GUI
Graphical.js library
The GUI of your application is in html. This choice makes multiplatform easier. If you use our graphic library, the interface automatically adapts to the device (on the hub, iPhone, Android ...). Otherwise, you can create different versions of your interface between devices (not recommended).
Our Graphic Library extend Raphael.js. In the few lines, you can create button, table ...
Some examples:
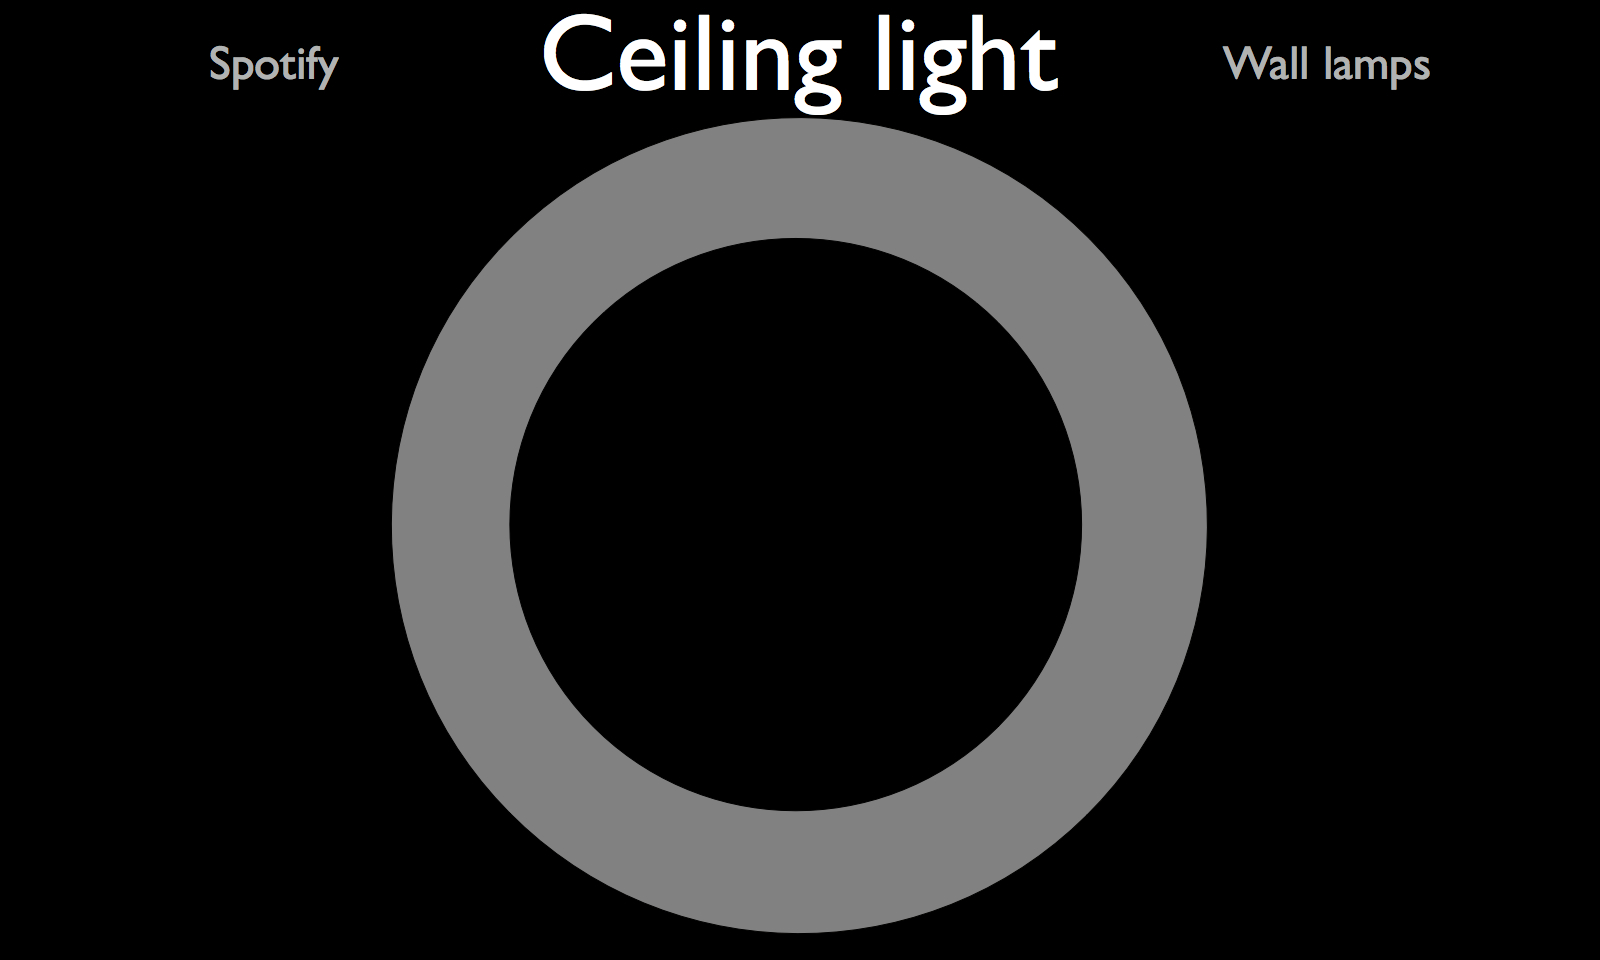
Create a switch / dimmer switch
var doc=new paper();
var sw=doc.simpleSwitch({"fill":Params.ColorDefault,"dimmer":true});
The result :
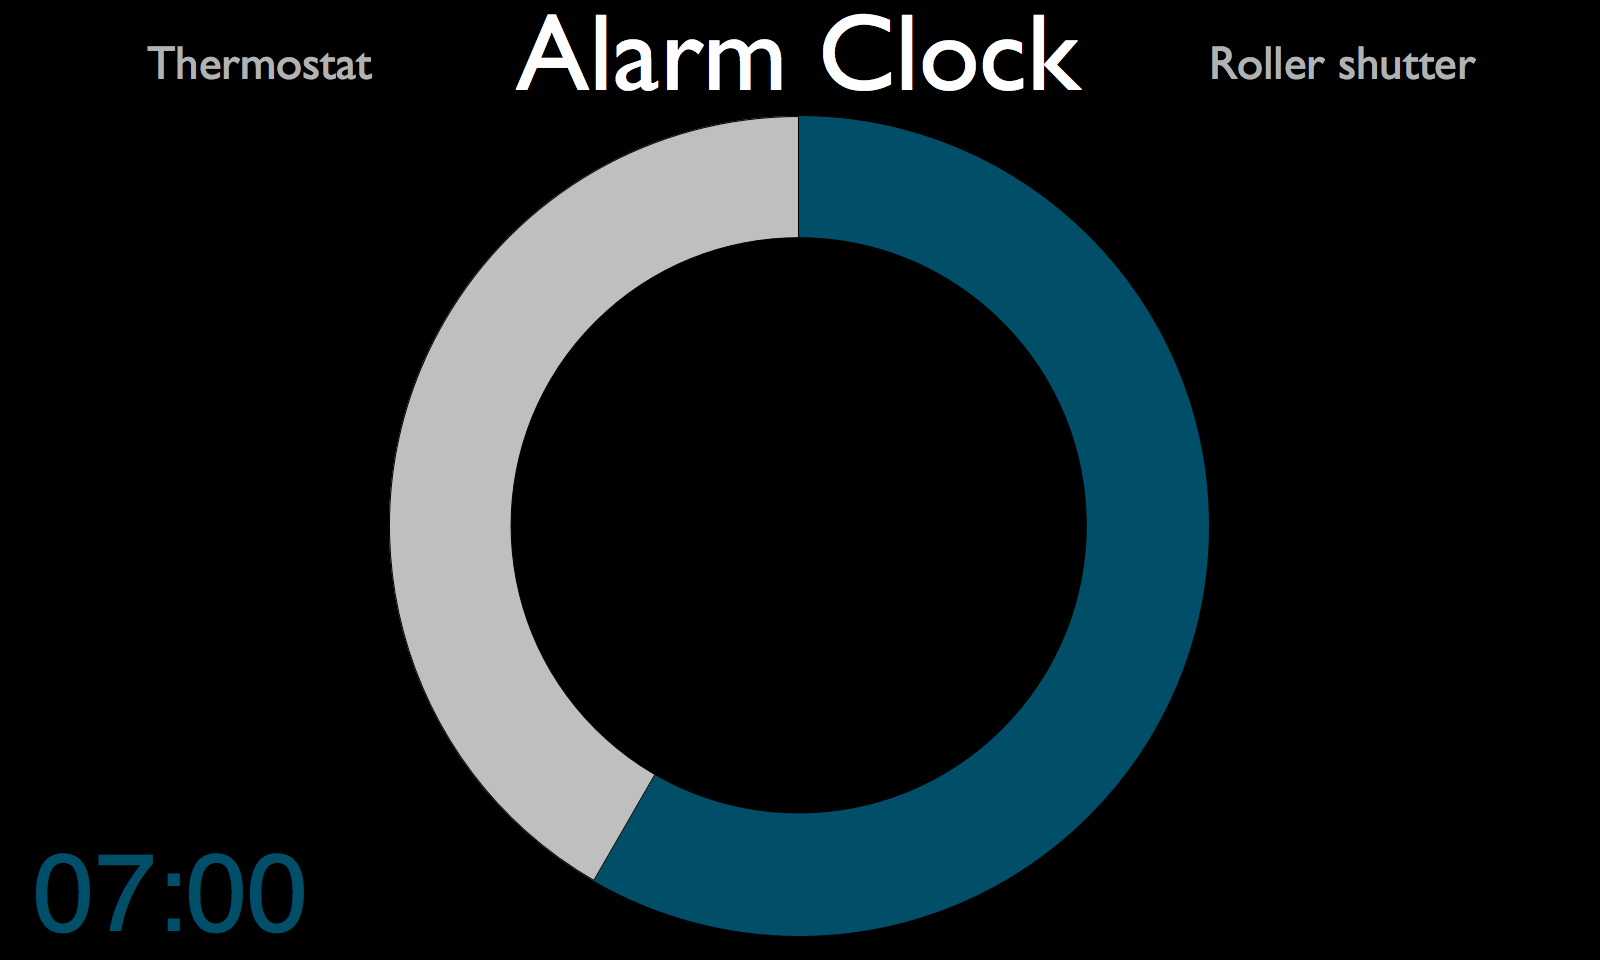
Create a timer with text
var doc=new paper();
var clockColor="#14384E";
var sw=doc.clock({segments:120});
for(i=0;i<70;i++) sw.circleOutSegment[i].attr({"fill":clockColor, "stroke":clockColor});
var swTxt=doc.bottomText({"location":"left","fill":clockColor,"text":"07:00"});
The result :
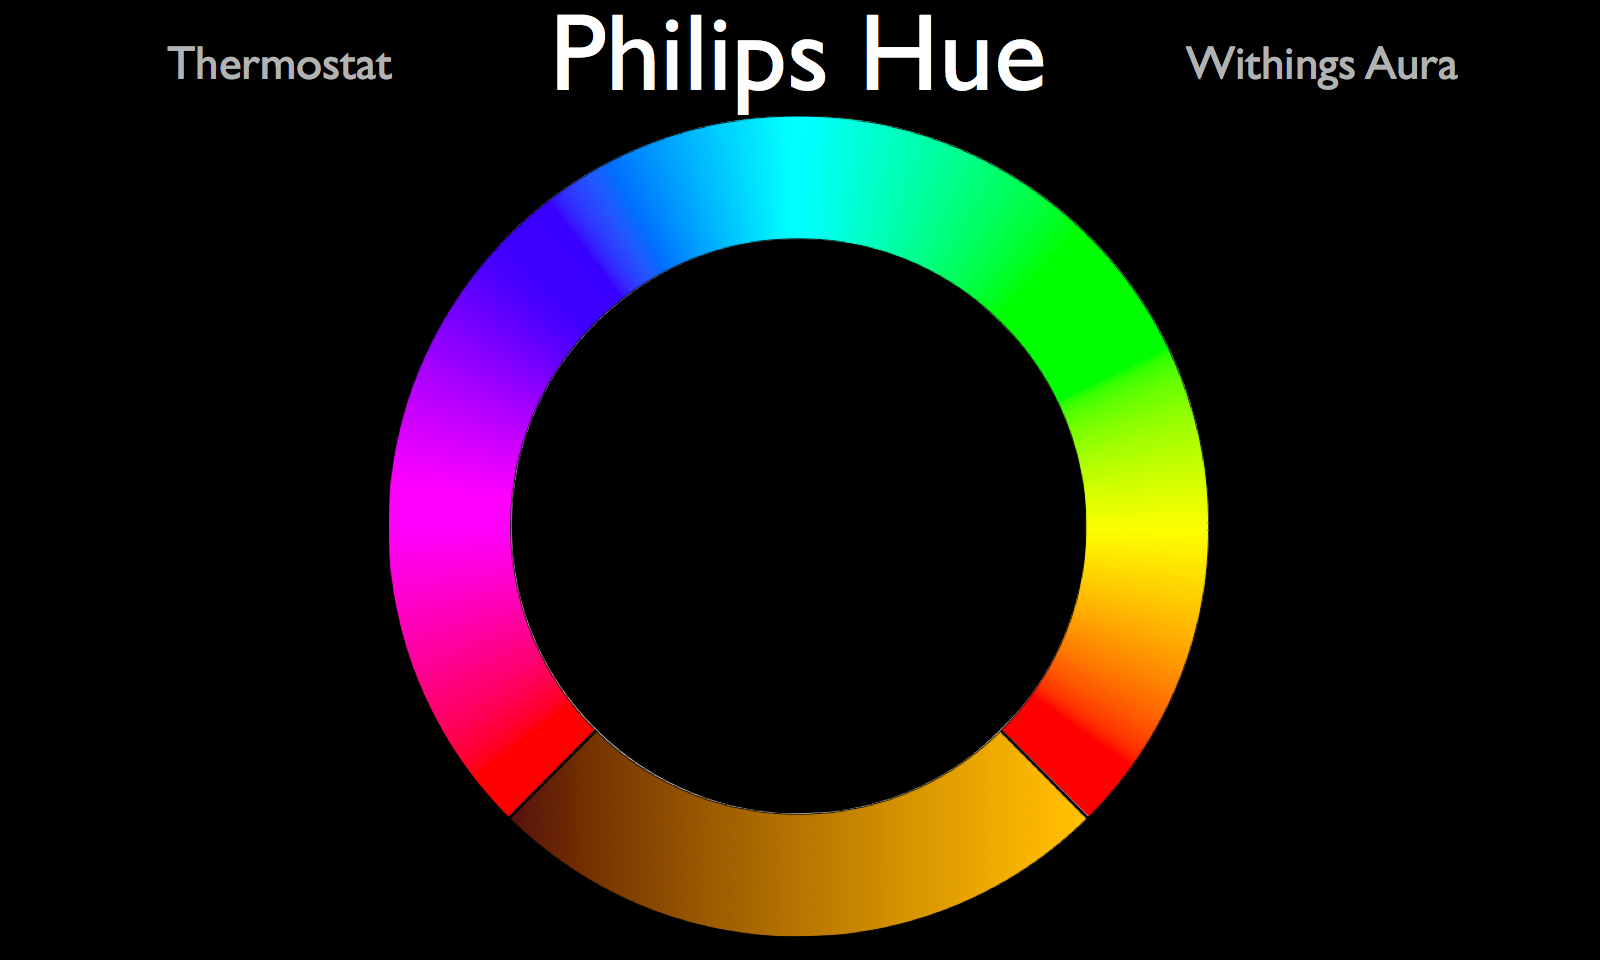
Create a multicolor dimmer
var doc=new paper();
var sw=doc.multicoulorSwitch({value:true});
The result :
Communication between client and server.
Sending messages in real time is extremely simple. On the server side use, "newMessage". You are free to create the structure of message as you want. This message will be distributed to all your pages without looking at the child. Think to use the child's uuid in order to facilitate exchanges.
event.emit("newMessage", "My Message");To receive a message, listen "message".
event.on("message",function(data){console.log("message : "+data)});On the client side, You can emit an event with this following line :
document.dispatchEvent(new CustomEvent("newMessage","Your message"););To receive a message, listen "message".
document.addEventListener("message", function(data) {
       console.log(data);
});
Distribute your application
To distribute your application, the easiest way is to upload your app on the infini Market, our app store.
When opening the infini Market, you can submit your application, accompanied by a description, screenshot ...
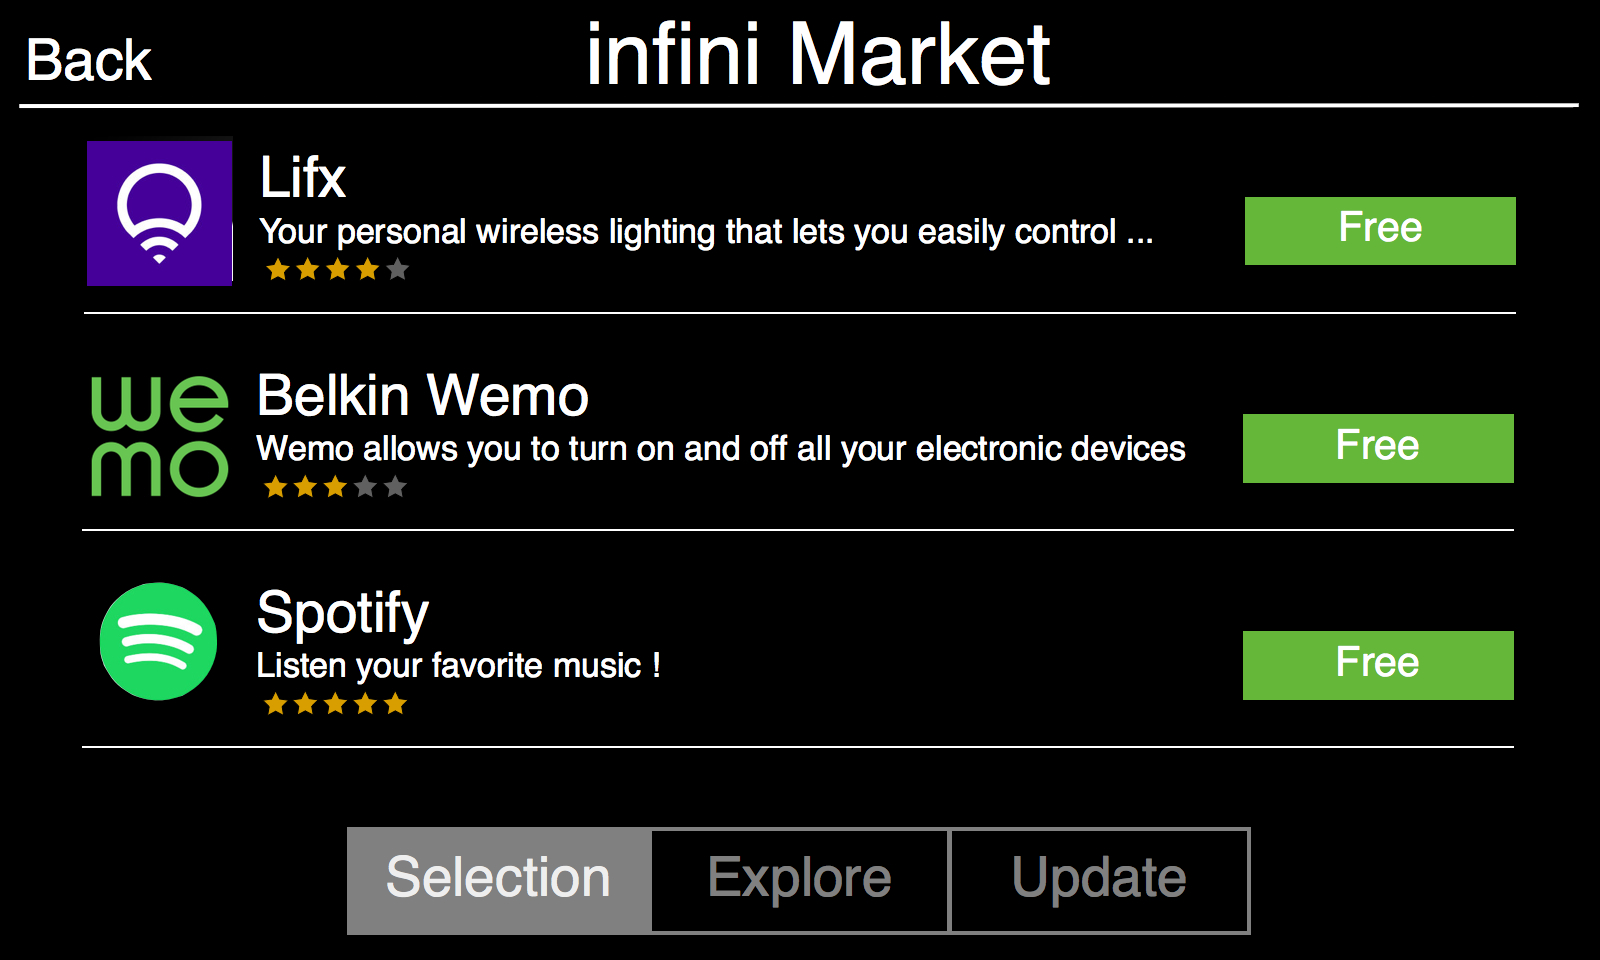
By default, hubs can only download applications from infini Market. The "dev" mode is also used to install third-party applications. So, you can distribute your application by your own means. Only hubs in "dev" mode will be able to download your application in this case.
Super app
You can create "super apps" and take full advantage of the APIs made available. "Super apps" are more restrictive: we must have access to the source code, the validation time is a bit longer and the user is warned about the risks.
A "super app" allows to send orders directly and to receive all the events emitted by the other applications.
Emit "getHomeConfiguration" to receive home's configuration.
[{
       "packageId": "com.getinfini.test",
       "children": [{
              "childId": "lightV1",
              "type": "light",
              "roomId": 0
              }, {
              "childId": "tempV1",
              "type": "temp",
              "roomId": 1
       }]
}, {
       "packageId": "com.meethue.hue",
       "children": [{
              "childId": "light1",
              "type": "multicolorLight",
              "roomId": 0
       }, {
              "childId": "light1",
              "type": [{
                     "id": "lamp1",
                     "type": "multicolorLight"
              }, {
                     "id": "lamp2",
                     "type": "multicolorLight"
              }],
              "roomId": 1
       }]
}]
Listen "event" to receive application events
{
"packageId": "com.getinfini.test",
"childId": "lightV1",
"type": "light",
"value": "on"
}
Emit "newOrder" to send an order
var data={
"packageId": "com.getinfini.test",
"childId": "lightV1",
"type": "light",
"value": "off"
}
event.emit("newOrder",data);